Showing posts with label free design. Show all posts

November 22, 2016

Two-Sided Christmas Card
Free Download


Hey Everyone,

Like I promised, here is my Christmas card for this year. I wanted something simple and that's what I did. I wanted a design that allowed me to write personal notes to each family/friend that we are sending these to, hence the large white space. I also didn't want to have anything on the front of my card. I know some relatives use the card as my family's portrait for the year.

I really love the way it turned out and I'm even more excited by the amazing print job that Persnickety Prints did! Seriously, I was blown away when I got my package. I live in Kansas and it was quick printing and delivery!  If you are a Utah local, you would get them super fast and if you live in the Orem/Provo area; you would get them literally next day if you did pick up at store. Sooooo freaking fast! As a photographer print quality is very very important to me and Persnickety nailed it!

Thanks Persnickety! Here is a photo of my card from Persnickety.

Anyways, to download this card follow the steps below.! We'd love to see our designs in print! Please add a comment with an image.


TO DOWNLOAD THE PHOTOSHOP FILE FOR YOUR OWN PERSONAL USE, GO HERE

If you don't have photoshop, No worries! I've got your back. I've created a version without the "Love, the..." It just has "Be Merry" on the back for you to then add your own signature after printing. With this version you just need to send this to the print shop you prefer, along with any image.  No editing required. (I highly recommend Persnickety Prints!)

TO DOWNLOAD THE JPEG VERSION FOR YOUR OWN PERSONAL USE, GO HERE

***NOTE!!!! THIS IS NOT A PHOTO CARD! You will need to send this to a professional printer that does two sided printing. 


Here are few steps to help you with the Photoshop file.  

1) Again, it's a photoshop file. You will need photoshop to edit the card yourself. 

2) You will need to download and install this font from dafont.com.

3) There are only three layers 1) Background, 2) The main design and 3) Love, The.... Just  change your name from "Morgans" to your last name, and add 2016 to the end. 

If you want us to edit the card, because, 1) it's easier for you for us to do it or 2) you don't have photoshop.. we charge $10 to edit.

If you have any questions, leave a comment or email us at lovinglifedesigns@gmail.com


*Remember - Loving Life Designs downloads are for followers only. We ask that if you download our creations you become a follower. It only takes a second. Thanks.

Thanks for reading!


Creative Commons License

December 1, 2015

Christmas Card 2015
Free Download

Hi everyone, we have missed posting, but we are still not back. Our lives are still busier then ever. With new jobs and new business adventure, we have our hands full. Fingers crossed one day we are back to designing for our site. 

Today I have for you our annual Christmas card download. We've been doing one since 2012 and I had to do one! This is my Christmas Card for the 2015 year. I designed it as a photo Christmas card. Instead of worrying about a back, and finding a printer that will do a back and front side, send it to your local or my favorite site, mpix.com, and print as a photo. Good luck!


TO DOWNLOAD FOR YOUR OWN PERSONAL USE, GO HERE

Have fun with it! We would love to see our designs in print! Add a comment with an image.


Here are few steps to help you with the file.  

1) It's a photoshop file. You will need photoshop to edit the card yourself. 

2) There are only three layers 1) Background, 2) Love, The... and 3) The main design. Add your picture in-between the "Love,.." and the background layer. Super simple! Remember to change your name from "Morgans"

If you want us to edit the card, because, 1) it's easier for you for us to do it or 2) you don't have photoshop.. we charge $10 to edit.

If you have any questions, leave a comment or email us at lovinglifedesigns@gmail.com


*Remember - Loving Life Designs downloads are for followers only. We ask that if you download our creations you become a follower. It only takes a second. Thanks.

Thanks for reading!


Creative Commons License

April 22, 2015

Free Blog Sidebar Profile Image Design
{Free Blog Element Download}


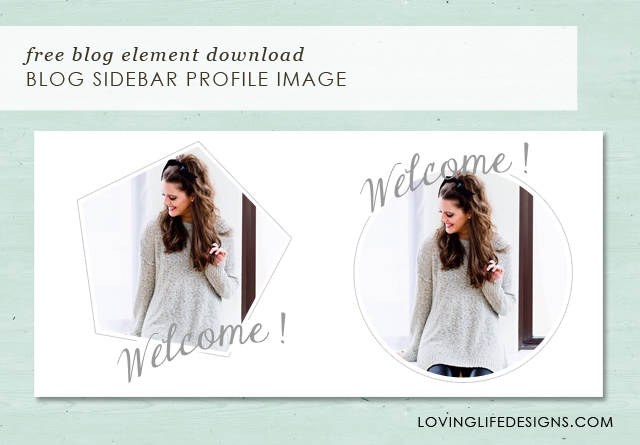
Today I have a free blog element for you to download, a sidebar profile image that you can personalize to match your blogs design.

To warn you this is a Photoshop PSD file. In order to personalize this element you MUST have Photoshop or Photoshop Elements. If you don't have Photoshop? We can edit it for you. Prices start at $10.

A sidebar profile says a lot about a blog and it's author. In just a few sentences it can tell your reader who you are, what the blog is about and why they should keep coming back. A great looking profile image can help draw a reader in and allow them to connect with you. I don't know about you but it's one of the first things I read when I scan a new blog.

Blogs are also about highlighting your personality and who you are as an author. It's why your readers come back time and time again. You're interesting, they like what you have to say, and they appreciate it. They want to get to know you and what you are doing. Having a generic uninteresting profile doesn't interest readers and it doesn't let them get to know your personality. Thats why I have given you the opportunity to personalize this image with your own colors and picture.

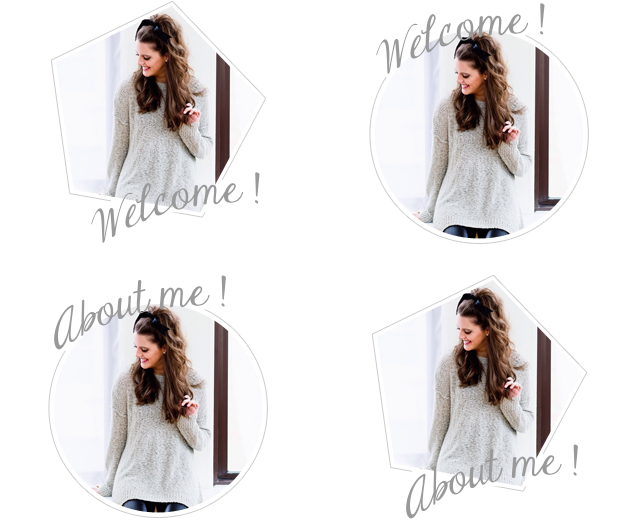
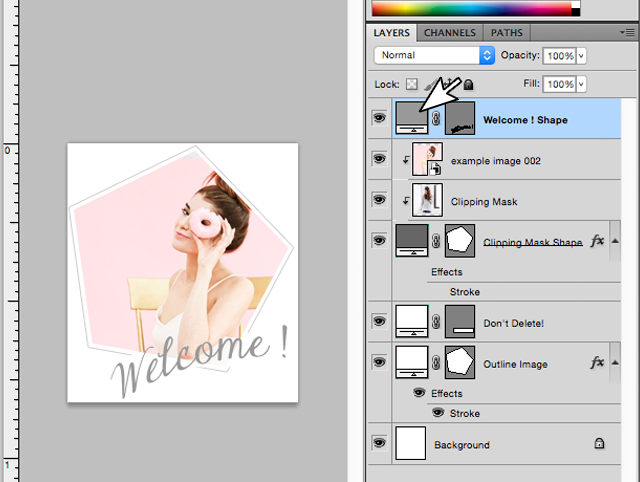
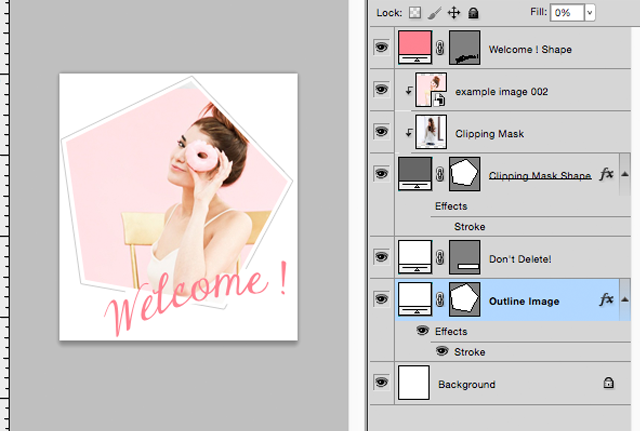
I have 4 different but similar designs for you to choose from. A pentagon and a circle. One says "Welcome!" and the other says "About me!".  This file is super easy to personalize and I've provided a tutorial for you below.

My favorite is the pentagon that says Welcome! What's your favorite? - You can download the (FOR PERSONAL USE ONLY) PSD files below.


*Remember - Loving Life Designs downloads are for followers only. We ask that if you download our creations you become a follower. It only takes a second. Thanks.


Lets PERSONALIZE this THING!

In this tutorial I'll show you how to change the picture and colors to make this profile image perfect for you and your blog. We'll take your drab profile to turn it totally fab. (always wanted to use that in a blog post!)


How to Change the Profile Image. 

I'll quickly walk you through these steps, but if you want detailed instructions on how to use a clipping mask in a loving life designs project you can read more about it in this tutorial I posted a couple months ago.

1. Navigate to the file you have stored your photo. I like to store a copy of my photo on my desktop. I think it makes it easier to locate.
2. Drag and place the image into the opened photoshop file.
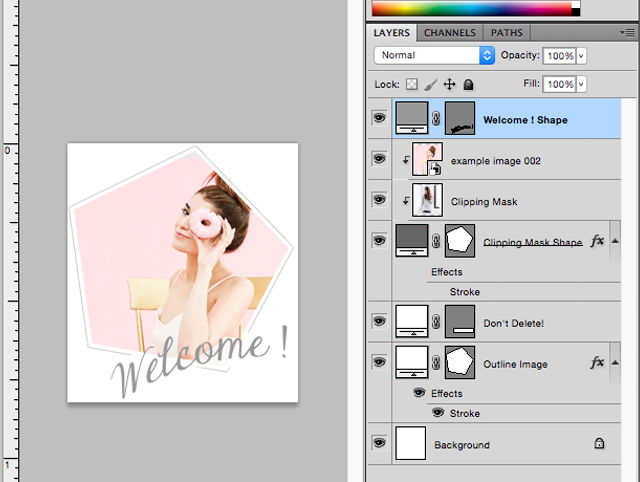
3. Move you profile image layer just above the layer titled clipping mask.
4. Right click your image layer and select create clipping mask (or hold down the option key and click on your images layer). Doing this should constrain the image to the pentagons shape.
5. Resize your image to fit inside the pentagon.

How to change the Welcome/About me text color.

I did something pretty nifty to make this process easier for you. I converted the text to a shape so you don't have to worry about installing the font.

1. Start off by selecting the Welcome/About me shape.


2. Double click the layer thumbnail.


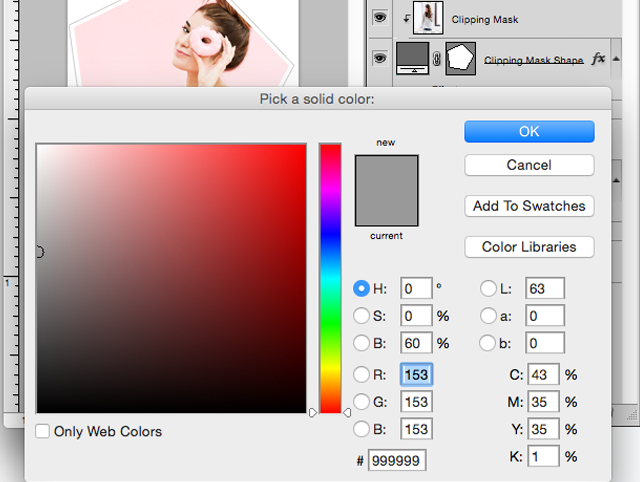
3. The color selector dialog box should open.


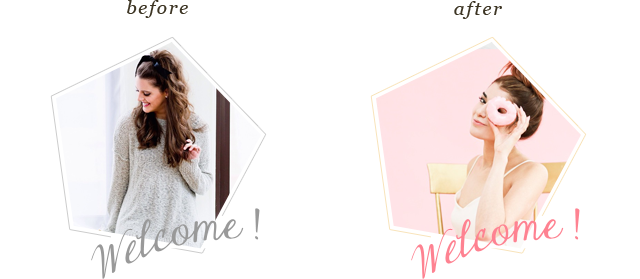
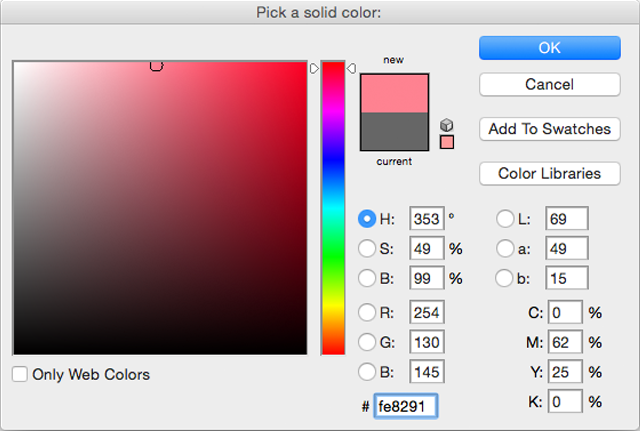
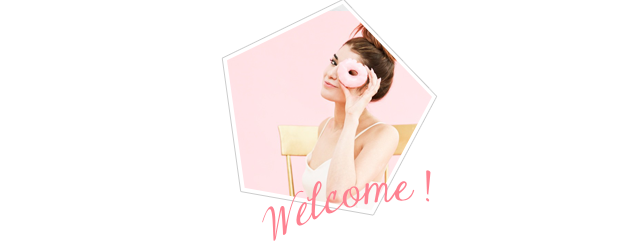
4. Pick a color or add a HEX number - I chose a nice pink to match my profile image - click okay. Done! Easy peasy lemon squeezy!


Half way there - So far we have changed the image and the color of the text. Does yours kind of look like this right now? You can stop now if you chose. The grey outline would be nice accent to this profile image.


How to Change the Outline Color

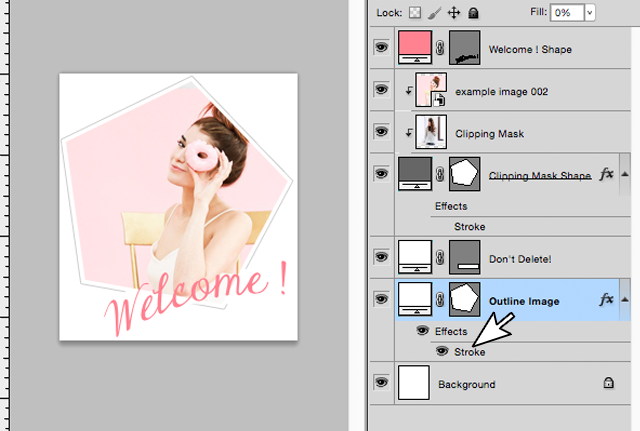
1. Select the Outline Image layer.


2. Double click the word stroke.


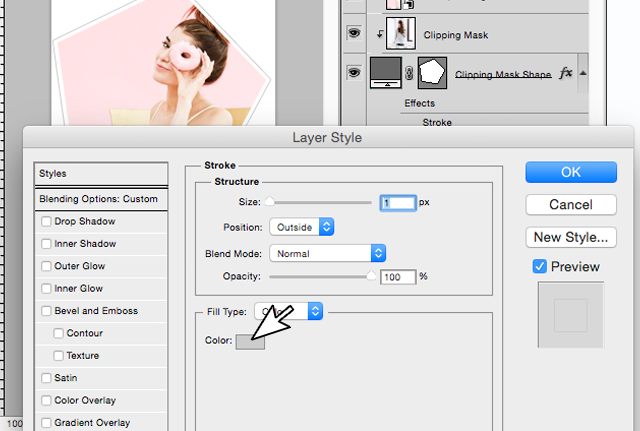
3. Click the grey box in the layer style dialog box.


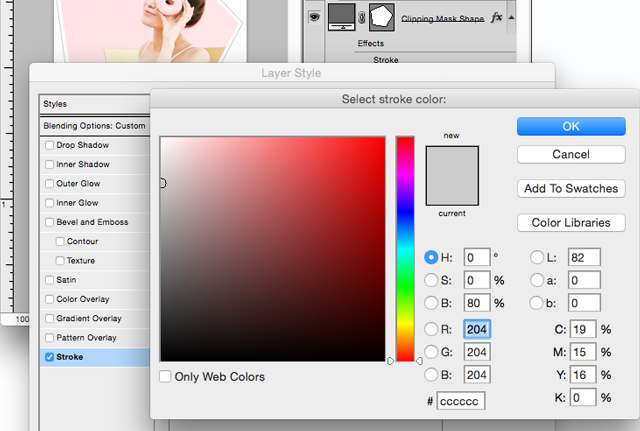
4. Pick a color or add a HEX number in the color selector dialog box. Then click okay and then okay again.


Viola You are done! Step back and admire your new sidebar profile image. Doesn't it look just FABULOUS?

If you have any questions or comments please email us at lovinglifedesigns @ gmail.com or leave a comment on a post.

Thanks for reading.

Creative Commons License

March 4, 2015

March 2015
Visiting Teaching Handout


This months Visiting Teaching message is about the long suffering and patience of Jesus Christ. You can read the article here.

I found it to be a uniquely profound message for myself. I've been struggling with my patience lately - with my children, my family, generally just in life. It was a comfort and a wonderful reminder, on what it means to be patient.

The quote I chose for the handout spoke to me deeply. In fact the entire paragraph this quote is from hit me hard and stuck.
“Patience means accepting that which cannot be changed and facing it with courage, grace, and faith. It means being ‘willing to submit to all things which the Lord seeth fit to inflict upon [us], even as a child doth submit to his father’ [Mosiah 3:19]. Ultimately, patience means being ‘firm and steadfast, and immovable in keeping the commandments of the Lord’ [1 Nephi 2:10] every hour of every day, even when it is hard to do so.”
I hope, like me, everyone will work on being patient this March.

What stood out to you?


*Remember - Loving Life Designs downloads are for followers only. We ask that if you download our creations you become a follower or like our Facebook page. It only takes a second. Thanks. 

 *A little note - The image is 4x6 size card. Sorry to those of you who prefer 5x7 size cards. If you would like a 5x7 size let me know and I'll whip one up.


Thanks for reading. Enjoy!


We also have some smartphone wallpapers you can download and use.

How to download and install LLD's wallpapers - While viewing the site on your phone, click on the corresponding link and it will take you to a new page, hold your finger down on the image, a dialog box will appear after a few seconds asking what you want to do with the image, click on "Save Image". You can then assign the picture to your wallpaper through your settings panel.


Creative Commons License

February 7, 2015

February 2015
LDS Visiting Teaching Handout


Hey everyone, today's download is this month's visiting teaching message. It's beautiful! Go and read the full message, it's linked below. It's all about Christ and His atoning sacrifice, and how we can better understand and relate to Christ through His atonement. The quote by Elder Todd Christoferson is so simple but so powerful! What was your favorite quote/section?
The full visiting teaching message can be found here - The Attributes of Jesus Christ: Without Sin. 
*Remember - Loving Life Designs downloads are for followers only. We ask that if you download our creations you become a follower or like our Facebook page. It only takes a second. Thanks.

*A little note - The image is 4x6 size card. Sorry to those of you who prefer 5x7 size cards. If you would like a 5x7 size let me know and I'll whip one up.


We also have a phone wallpaper for you to download and use.

On your phone, click on the corresponding phone, it will take you to a new page, hold your finger down on the image, a dialog box will appear after a few seconds asking what you want to do with the image, click on "Save Image" You can assign the picture to your wallpaper through your settings>wallpaper


Creative Commons License

January 8, 2015

January 2015
Visiting Teaching Handout

This months Visiting Teaching Message is the beginning of a new theme: The Attributes of the Savior. This months attribute is Obedient Son. You can read more about the lesson here.

The phrase that stood out most to me was that "Obedience IS the first law of Heaven."

What was your favorite part of the message?

I hope you like the design.  I tried to go with something warm and springy. I really hate winter and wish it was warming up. Spring is my favorite season. Its just perfect outside. Not to hot, not too cold all the flowers are blooming. And I'm making myself sad. I will stop now.

Some Ideas on what to do with the handout. 
  • She or you can use it as a bookmark.
  • Purchase a small photo frame - she can switch out the message each month.
  • Give her a small photo album - she can add the card to it and by the end of the year have a sweet little book full of nice uplifting messages.


*Remember - Loving Life Designs downloads are for followers only. We ask that if you download our creations you become a follower or like our Facebook page. It only takes a second. Thanks. 

*A little note - The image is a 4x6 size card. Sorry to those of you who prefer a 5x7 size cards. If you would like a 5x7 size let me know and I'll whip one up.


Creative Commons License

December 3, 2014

December 2014
Visiting Teaching Message Handout


Alright, we've never done this before. Consider this the Inaugural Visiting Teaching handout printable. I'm kind of excited about this. I've been wanting to do it for YEARS now but never did. I wasn't sure if I should. I'm not the greatest at designing posters. I can whip up an invitation or a photo card so fast it will make your head spin but posters take me forever and I always feel they're never finished.

With that said...I hope you like it, download it and use it.

The quote is from Elder Richard G. Scott of the Quorum of the Twelve Apostles. He taught: “The ideal place for … peace is within the walls of our own homes, where we have done all we can to make the Lord Jesus Christ the centerpiece.”.

This months full visiting teaching message can be found here - The Divine Mission of Jesus Christ: Prince of Peace. Read the whole thing it's very uplifting.

Some Ideas on what to do with the handout. 
  • She or you can use it as a bookmark.
  • Purchase a small photo frame - she can switch out the message each month - totally perfect this month as a small Christmas gift. 
  • Give her a small photo album - she can add the card to it and by the end of the year have a sweet little book full of nice uplifting messages - again, totally perfect this month as a small christmas gift. 


*Remember - Loving Life Designs downloads are for followers only. We ask that if you download our creations you become a follower or like our Facebook page. It only takes a second. Thanks.

*A little note - The image is 4x6 size card. Sorry to those of you who prefer 5x7 size cards. If you would like a 5x7 size let me know and I'll whip one up.


Creative Commons License

November 3, 2014

Love, Joy, and Happiness Holiday Card Design
Free download


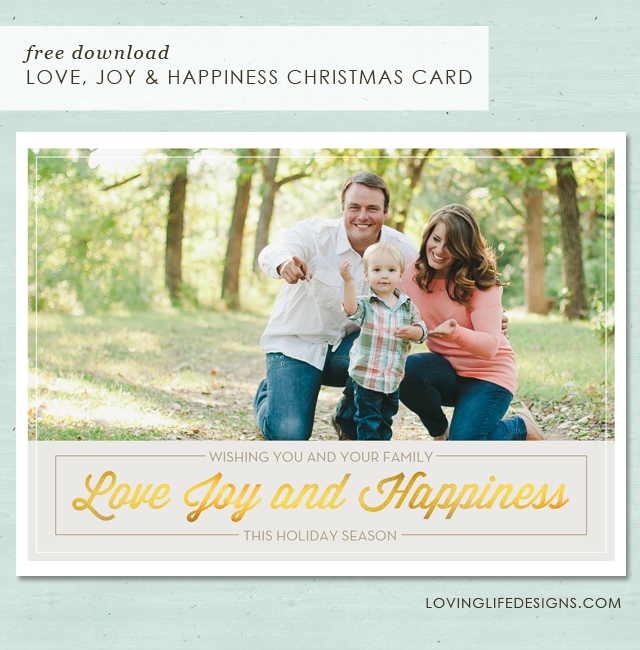
Hey everyone, It's that magically time again. CHRISTMAS TIME IS HERE! This year I created a classic looking design for y'all to use as your holiday card. I honestly love, love, LOVE it!  This card is also featured in our new etsy shop.

TO DOWNLOAD FOR YOUR OWN PERSONAL USE, GO HERE

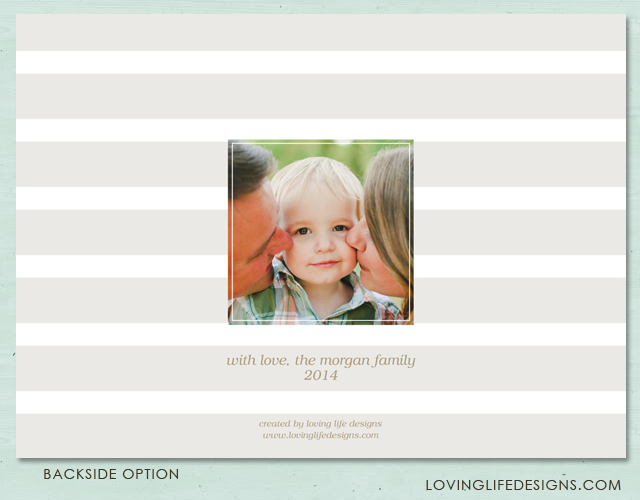
You'll need to download the font for the backside's "with love" part. The font is titled, Tex Gyre Bonum. I used the font's italic option. Download it here at Squirrel Fonts.

Have fun with it! We would love to see our designs in print! Add a comment with an image.


Here are few steps to help you with the file.  

1) It's a photoshop file. You will need photoshop to edit the card yourself. If you don't have photoshop, purchase this from our new print shop. We'll handle all the editing and printing for you.

2)There are two folders. One for the backside and one for the front side. You can't just auto select the layers. You will have to click on each layer individually to edit them. I created a layer in each folder saying "add photo here" above the clipping mask shapes. 

3)You'll want to then create a clipping mask to get the photo in the appropriate location. Elizabeth created a great tutorial on clipping masks in her last post, here.

If you have any questions, leave a comment.


*Remember - Loving Life Designs downloads are for followers only. We ask that if you download our creations you become a follower. It only takes a second. Thanks.

Thanks for reading!


Creative Commons License

October 8, 2014

"The Magic of Christmas" Chalkboard Christmas Card
Free Download

Yes, Yes,  Halloween is still to come, but I know it, you know it, EVERYONE knows it. It's time to start thinking about Christmas.

Today I have another Chalkboard Christmas Card for you to download. For some reason we're really on a chalkboard kick.  This card is also featured in our etsy shop if you don't want to do the editing and printing yourself.

I've done something a little different with this card than I have with other cards, in the past.  The image area is a clipping mask. What is a clipping mask? I'll let adobe explain.
"A clipping mask is a group of layers to which a mask is applied. The bottommost layer, or base layer, defines the visible boundaries of the entire group. For example, suppose you have a shape in the base layer, a photograph in the layer above it, and text in the topmost layer. If the photograph and the text appear only through the shape and outline in the base layer, they also take on the opacity of the base layer. "
Clear as mud? I thought so. You can read more about it here. Scroll down to see the tutorial on how to add an image using a clipping mask.

I used two fonts for this Christmas Card, DK Carte Blanche and DK Wayang. They both can be downloaded from DaFont.com.


*Remember - Loving Life Designs downloads are for followers only. We ask that if you download our creations you become a follower. It only takes a second. Thanks.

If you don't want to handle the pain of editing or printing yourself, let Loving Life Designs do it for you! You can purchase this card and many others in our new print shop.

This card requires two downloads. The front of the card, which is a PSD file, and the back of the card. For the back of the card I have two download options for you, a JPG or a PNG.


Thanks for reading.

Enjoy - (: 


How to add your family image using the clipping mask to loving life designs Christmas card.
  1. In photoshop click file/open.

     
  2. Navigate to your family photo. 


  3. Click on it and then hit enter/return or the open button. 
  4. Drag the photo onto the christmas card. (Seriously, it's as easy as grab, drag and drop.)


  5. Move the family photo layer to just above the layer titled clipping mask shape
  6. Right click the family photo layer and select create clipping mask. 


  7. If you have it lined up correctly the happy couple with the dog should disappear and your image should only be seen in it's place. 
  8. Resize the image to your liking.


  9. Thats it! Enjoy your Christmas Card.  If you have any trouble email us at lovinglifedesigns at gmail.com
Creative Commons License

April 14, 2014

Doctrine and Covenants Easter Poster
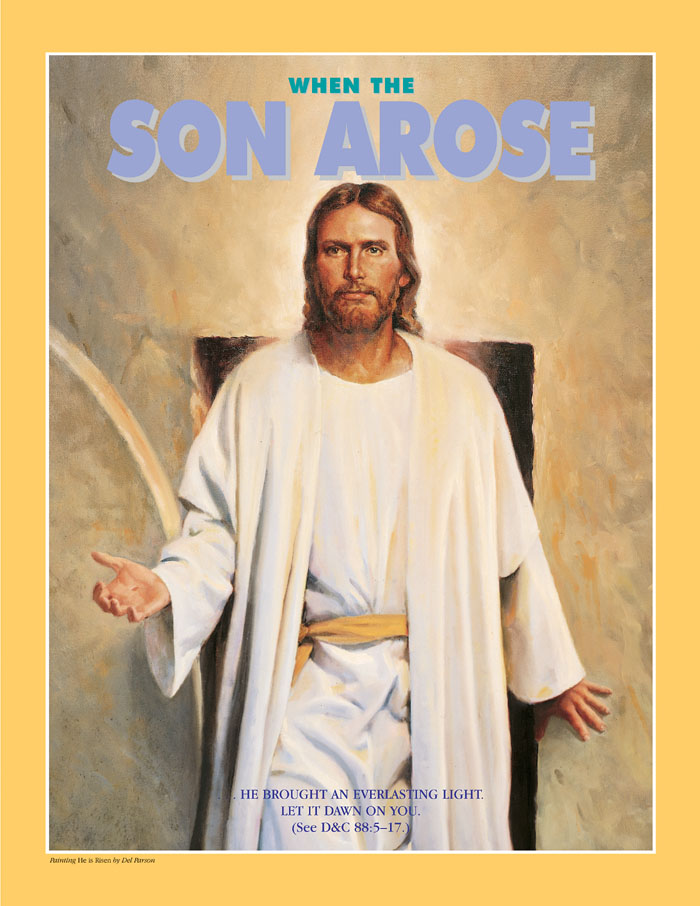
When the Son Arose {Free Printable}

Hi there everyone. I know is been about a years since we've posted anything. It's been a crazy busy year for the two of us. Thank you everyone for continuing to follow us and support us.

Easter is coming up and I felt inspired by pinterest and all the "He is risen" Easter posters that have been pinned and while I was pursuing the inter webs for an inspiring easter quote I found this New Era Poster from April 2002.


I don't know why but the poster made me feel something and after reading the scripture it struck me so much so that I felt like I wanted (after a year of being absent) to make a poster to share with all of you. 

I think the reason I felt so inspired by the New Era poster is because I just LOVE spring and Easter and the light and renewal the both bring to the world. I could go on but I don't want to bore you. I just wanted you to know it makes me happy. 


*Remember - Loving Life Designs downloads are for followers only. We ask that if you download our creations you become a follower. It only takes a second. Thanks. 

 I have three colors for you to choose from and all are 8x10 images.

Creative Commons License

July 24, 2013

How to Download and Install
Loving Lifes Blogger Templates
{Blogger Tutorial}

I've had several questions, lately, on how to download and install Loving Life Designs Blogger Templates. I hope this clears up any confusion there might be on how to do this.

First you'll need to decide on which template you would like to use on your blog. For this tutorial I have chosen to download and install my Simple Two Tone Template Sunshine and Clouds. Click on the download here button or text that has been provided as a link.

After you have clicked on the link you SHOULD be linked to this or a similar box.com webpage. If you are not sent to this page please let me know, and let me know which template is not working. If you are seeing this page then you are in the correct place. 


Next, in the top left there is a download button - Click it. 
    

It should then download the XML file. Take note as to where it was downloaded on your machine. 

Now you'll want to open your blogs dashboard and click on Template. 

On the top left of the browser window is a back up and restore button - Click it. 


A window looking like the one below should pop up. 


If you have made changes to your blog and would like to keep those for any reason or to make a backup of how your blog looks now, incase there is a problem with the upload, click on download full template and save it. 

If you don't care click choose file below the phrase "upload a template from a file on your hard drive". Find the new template file on your hard drive and click choose or okay. 

The pop up window will then look like this. 
With a little spinny wheel telling you it's uploading. 

Once the template has uploaded the window should close automatically. You can see that the new template has taken affect when you see the new template in the live on blog screen. 


To see the blog full screen click on view blog.


Viola you are done. 


Clear as mud? 

Creative Commons License