December 29, 2014

Loving Life Designs Announcement
Custom Blogger Designs


Today we would like to take a moment and tell you about a new design service that we are bringing back. Okay, so it's an old service that we have not done it a while, how can it possibly be new? So it's not new but it's new again. I should stop.

The starting price is $100 and goes up from there. It most likely would never go above $175 or $200 it all depends on what you want.

What do you get for $100?
  • Custom Header
  • Background
  • Menu Bar
  • Three (3) Styled Stand Alone Pages
  • Social Media Icons
  • Coordinating Colors and Fonts Throughout
  • Custom About Me/Welcome Image
  • Total Install and Troubleshooting support FOREVER! Seriously. We don't want to leave anyone in a pickle. 
$35 Deposit will be required before any designs will be started - Paid through ETSY. 

If you have any questions about the process feel free to email us at lovinglifedesigns@gmail.com. 

Take a look at our most recent blog redesigns (Revision Fitness, Vegas Fitness and NutritionA Heart Willing to Follow and Michelle Morgan Photography) and you'll get a good idea of what you can expect from us. 

Thanks for Reading - Seriously take advantage of this service. We kind of ROCK! :)


Creative Commons License

December 16, 2014

How to make Blogger Comments Avatar Image Round
{Blogger Tutorial}

Last week I showed you how to turn your Blogger About Me widget image from square to round. This week I am showing you how to make your commentors avatar image round. Again, just like last week, this update will take you about 30 seconds.

How to Make Blogger Comments Avatar Image Round: A Blogspot Tutorial

1. Go to Dashboard > Template > Edit HTML.
2. A few lines down you'll find <b:skin>--</b:skin>


3. Click the arrow next to it to expand your blogs template code.
4. Scroll down until you find #comments .avatar-image-container img
5. Just after the { but before the closing } you will need to add the following code.
-webkit-border-radius: 50em; 
-moz-border-radius: 50em; 
border-radius: 50em;
6. And change the border width from 1px to 0px.
7. Save your template.

Viola you are done! Again bask in the awesomeness of your round avatar.

If you have any questions feel free to leave a comment and I will be happy to answer them. If you apply this update to your blog, I would love to see it in action. Leave a comment and post a link to your blog.

Creative Commons License

December 12, 2014

How to make blogger 'about me' profile picture round
{Blogger Tutorial}


Tonight (yes tonight! I blog when I can. Kiddos are asleep!) I have a really simple update you can make to your blog in about 30 seconds. Circles and triangles are all the rage right now in the design world. And thats fine with me. I'm a minimalist and I LOVE minimalist designs and the simple circle is the best form of minimal design.

Seriously, this is the fastest update ever. I think it would take you longer to read this then it would to implement this.

How to Make Blogger "About Me" Profile Picture Round: A Blogspot Tutorial

1. Go to Dashboard > Template > Edit HTML.
2. A few lines down you'll find <b:skin>--</b:skin>


3. Click the arrow next to it to expand your blogs template code.
4. Scroll down and find ]]></b:skin> copy and paste the following code just ABOVE it.
.profile-img { margin:0 auto 0; -webkit-border-radius: 50em; -moz-border-radius: 50em; border-radius: 50em; }
5. Preview your template - make sure it worked.
6. Save your template.

Viola, you are done! Now bask the awesomeness of your round profile avatar.

The border-radius property is a shorthand property for setting the four border properties. This property allows you to add rounded borders to elements. You can learn more about the border-radius property here.

If you have any questions feel free to leave a comment and I will be happy to answer them. If you apply this update to your blog, I would love to see it in action. Leave a comment and post a link to your blog.

Wanna know how to make your commenters profile picture a circle, like here on Loving Life Designs, to match your new and improved profile about me avatar? (like pictured below?)


Sorry. You'll have to read about it next week - shameless plug, I know.

Creative Commons License

December 3, 2014

December 2014
Visiting Teaching Message Handout


Alright, we've never done this before. Consider this the Inaugural Visiting Teaching handout printable. I'm kind of excited about this. I've been wanting to do it for YEARS now but never did. I wasn't sure if I should. I'm not the greatest at designing posters. I can whip up an invitation or a photo card so fast it will make your head spin but posters take me forever and I always feel they're never finished.

With that said...I hope you like it, download it and use it.

The quote is from Elder Richard G. Scott of the Quorum of the Twelve Apostles. He taught: “The ideal place for … peace is within the walls of our own homes, where we have done all we can to make the Lord Jesus Christ the centerpiece.”.

This months full visiting teaching message can be found here - The Divine Mission of Jesus Christ: Prince of Peace. Read the whole thing it's very uplifting.

Some Ideas on what to do with the handout. 
  • She or you can use it as a bookmark.
  • Purchase a small photo frame - she can switch out the message each month - totally perfect this month as a small Christmas gift. 
  • Give her a small photo album - she can add the card to it and by the end of the year have a sweet little book full of nice uplifting messages - again, totally perfect this month as a small christmas gift. 


*Remember - Loving Life Designs downloads are for followers only. We ask that if you download our creations you become a follower or like our Facebook page. It only takes a second. Thanks.

*A little note - The image is 4x6 size card. Sorry to those of you who prefer 5x7 size cards. If you would like a 5x7 size let me know and I'll whip one up.


Creative Commons License

November 3, 2014

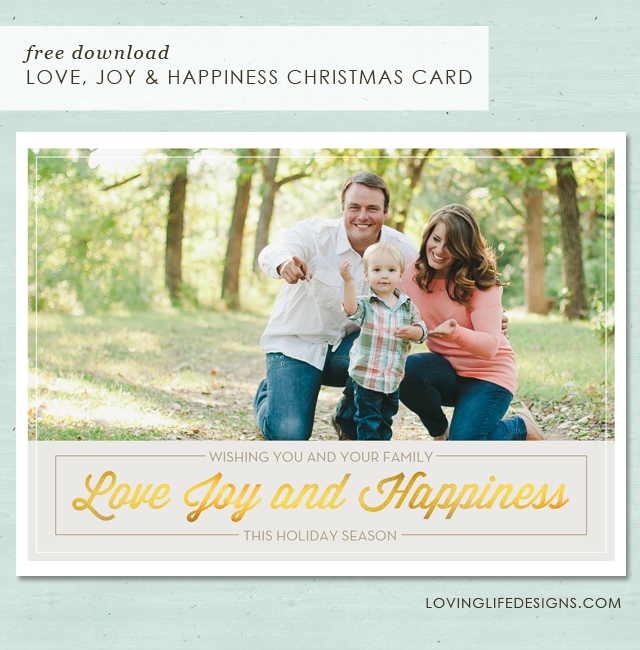
Love, Joy, and Happiness Holiday Card Design
Free download


Hey everyone, It's that magically time again. CHRISTMAS TIME IS HERE! This year I created a classic looking design for y'all to use as your holiday card. I honestly love, love, LOVE it!  This card is also featured in our new etsy shop.

TO DOWNLOAD FOR YOUR OWN PERSONAL USE, GO HERE

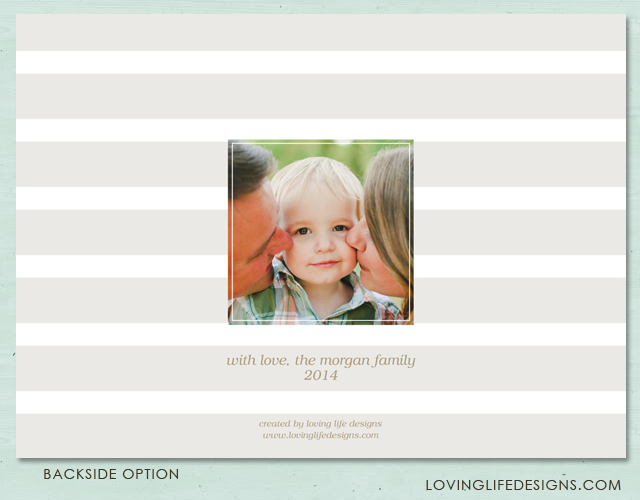
You'll need to download the font for the backside's "with love" part. The font is titled, Tex Gyre Bonum. I used the font's italic option. Download it here at Squirrel Fonts.

Have fun with it! We would love to see our designs in print! Add a comment with an image.


Here are few steps to help you with the file.  

1) It's a photoshop file. You will need photoshop to edit the card yourself. If you don't have photoshop, purchase this from our new print shop. We'll handle all the editing and printing for you.

2)There are two folders. One for the backside and one for the front side. You can't just auto select the layers. You will have to click on each layer individually to edit them. I created a layer in each folder saying "add photo here" above the clipping mask shapes. 

3)You'll want to then create a clipping mask to get the photo in the appropriate location. Elizabeth created a great tutorial on clipping masks in her last post, here.

If you have any questions, leave a comment.


*Remember - Loving Life Designs downloads are for followers only. We ask that if you download our creations you become a follower. It only takes a second. Thanks.

Thanks for reading!


Creative Commons License

October 8, 2014

"The Magic of Christmas" Chalkboard Christmas Card
Free Download

Yes, Yes,  Halloween is still to come, but I know it, you know it, EVERYONE knows it. It's time to start thinking about Christmas.

Today I have another Chalkboard Christmas Card for you to download. For some reason we're really on a chalkboard kick.  This card is also featured in our etsy shop if you don't want to do the editing and printing yourself.

I've done something a little different with this card than I have with other cards, in the past.  The image area is a clipping mask. What is a clipping mask? I'll let adobe explain.
"A clipping mask is a group of layers to which a mask is applied. The bottommost layer, or base layer, defines the visible boundaries of the entire group. For example, suppose you have a shape in the base layer, a photograph in the layer above it, and text in the topmost layer. If the photograph and the text appear only through the shape and outline in the base layer, they also take on the opacity of the base layer. "
Clear as mud? I thought so. You can read more about it here. Scroll down to see the tutorial on how to add an image using a clipping mask.

I used two fonts for this Christmas Card, DK Carte Blanche and DK Wayang. They both can be downloaded from DaFont.com.


*Remember - Loving Life Designs downloads are for followers only. We ask that if you download our creations you become a follower. It only takes a second. Thanks.

If you don't want to handle the pain of editing or printing yourself, let Loving Life Designs do it for you! You can purchase this card and many others in our new print shop.

This card requires two downloads. The front of the card, which is a PSD file, and the back of the card. For the back of the card I have two download options for you, a JPG or a PNG.


Thanks for reading.

Enjoy - (: 


How to add your family image using the clipping mask to loving life designs Christmas card.
  1. In photoshop click file/open.

     
  2. Navigate to your family photo. 


  3. Click on it and then hit enter/return or the open button. 
  4. Drag the photo onto the christmas card. (Seriously, it's as easy as grab, drag and drop.)


  5. Move the family photo layer to just above the layer titled clipping mask shape
  6. Right click the family photo layer and select create clipping mask. 


  7. If you have it lined up correctly the happy couple with the dog should disappear and your image should only be seen in it's place. 
  8. Resize the image to your liking.


  9. Thats it! Enjoy your Christmas Card.  If you have any trouble email us at lovinglifedesigns at gmail.com
Creative Commons License

October 3, 2014

Snowflake Merry & Bright Christmas Card
Free Download

Hey everyone, guess what is just around the corner! Christmas!! I know you aren't thinking about it right now. Nor am I! I'm still concentrating on Labor day of this year, and pleading with the weather Gods to keep up this beautiful weather we are having here in Kansas right now. It won't though. :( I'm honestly not a big fan of cold weather, even though I come from the great state of Utah. 
 
Today, I have this cute 5x7 christmas card for you to download (for personal use only). I created this card years ago for one of our readers. I decided to finally make it available for everyone else. I made some small changes to the original, but I still love this design even if it's more then a few years old. 
 
It's relatively easy to navigate in photoshop. I have a front to the design and a simple design for the backside (It is optional! below you will find instruction on what to do with it). I thought you could write personal messages to each person/family/relative you send these to, with the amount of negative space I give in the back. Make sure you have the appropriate font installed on your computer. I used the font called Euphorigenic. You can download it at dafont.com
 
TO DOWNLOAD FOR YOUR OWN PERSONAL USE, GO HERE
 
*Remember - Loving Life Designs downloads are for followers only. We ask that if you download our creations you become a follower. It only takes a second. Thanks. 

  If you don't want to handle the pain of editing this for print yourself, let us do it for you! Purchase this from our new print shop, go here to check it out. 


A little note about the psd file -

If you want to use the optional  backside for a double sided card - There will be two different folders and a layer with guidelines. One folder will have all the layer for the front design and layers for the optional backside. When you open the file, you will see what I mean. I suggest you save the different sides as a png or jpg file and naming them something like "backside/front for invitation". * sidenote: make sure that you hide the other layer when saving them for print, especially the guideline layer!

Where can you print double sided cards? You can use *Costco or *Vistaprint. There are other services but you can use, but you can do your own homework on that one.

If you are not planning on using the optional backside - If you plan on printing this as a 5 x 7 photo and purchasing your own envelopes. Then ignore the backside layer - you can delete it or just hide it, then begin working on your invitation.

If you have any problems email us at lovinglifedesigns at gmail dot com. 

*We are not getting paid to say that!

Enjoy!  Michelle 
Creative Commons License

October 1, 2014

Announcing Loving Life Designs
Print Shop


Today we would like to make a quick announcement about our NEW Etsy print shop.

Thats right! We have started a shop. We will still offer our designs for free here on our blog. Eventually, Loving Life Designs will be offering premium designs in the print shop. But that is not today.

What do you get if you purchase from our shop?

• First things first, Loving Life Designs will edit the design for you. This is wonderful if you don't have photoshop or any other PSD editing software.

• Take the hassle out of printing greeting cards and invitations yourself. Isn't it just a pain to figure out how to print it? where to do print it? and what is the best? We have done our research and have found a company that we are excited and confident about. They are amazing and we are positive you'll love them too. You can have your cards in as little as 7 days.

What comes with the cards and invitations?

• You get an amazingly high quality double sided digitally printed flat greeting card on 110lb cover stock card stock

•AND mailing envelopes.  (white for invitations and general greeting cards, holiday red for christmas cards)

Prices start at $30 for 15 cards.

Here are just a few items that are now available in the shop?


Don't see your favorite design from Loving Life Designs? No problem just drop us a line at lovinglifedesigns@gmail.com and we will make it.

*Remember all our designs are still free for you to download here and edit yourself. We are just helping to take the guess work out of doing it yourself.

Tell your friends and family.

Enjoy :)


Creative Commons License

September 5, 2014

Free Font Friday
Drop your Anchor


Today's font is one of my favorite's! I have used it in several custom designs. It's also the featured font in our new upcoming design. It's called Return to Sender designed by Jeremy Dixon

It's relatively new in the font world. It been around since last November. I believe I was one of the first people to snatch it, I've been using it for just about a year now. I remember going on to Dafont's front page and it was featured in their "Recently Added" area. It was love at first site! I just had to have it! 

Drop your anchor is free for personal and non-profit use. Jeremy asks for a $5 donation for commercial use. You can download Return to Sender from Dafont.

Check back soon to see the new free design and how I use Drop your Anchor.

Enjoy - Michelle

Creative Commons License

August 8, 2014

Free Font Friday
Return to Sender


Todays font was one I used in my LDS Baptism invitation I posted about last week. It's called Return to Sender designed by Tom Kolter.


I found this font perusing pinterest for chalkboard fonts. It came up a ton of times in other pins and blog posts about good chalkboard fonts. I thought it was just perfect for an invitation to a children's event. What do you think?

Return to Sender is free for personal use, but donations are always accepted. ANY commercial use requires a license, which is available for a fee. You can contact Tom for more information about that. You can download Return to Sender from Dafont.

What do you think of Return to Sender? What other uses do you think it would be good for?

Enjoy.

Creative Commons License

July 30, 2014

LDS Baptism Invitation
Free Download

In about six months my little girl will be getting baptized into the Church of Jesus Christ of Latter Day Saints and it's been on my mind a lot lately ("Am I ready? Is she ready? Do I teach her enough? Should I make her dress? Should I buy it? When will it be? It's Christmas time, are people gonna come? Should I take the pictures? Should I hire someone to take pictures?"). I just can't keep my mind off of it. There is one question I do know the answer to and that is I'll be designing her invitations.

In the spirit of freaking out over something that is six months away, I whipped up this little 5x7 Chalkboard Invitation Card. It also has a coordinating optional backside - in case you wanna really make this print fancy.

It's a pretty simple but it looks great. I think my favorite part is the chalkboard background. What do you like about it?

I used two fonts for this invitation Return To Sender and Century Gothic.  Make sure you have them installed on your computer before you open the psd file. Most computers should have Century Gothic installed already. Check before you download it.


*Remember - Loving Life Designs downloads are for followers only. We ask that if you download our creations you become a follower. It only takes a second. Thanks. 

I've designed the invitation in three color schemes (Boy, Girl and Neutral) all with a coordinating optional backside.

A little note about the psd (photoshop) file -

If you want to use the optional coordinating backside for a double sided card stock card  - When you open the file, the first layer open will be the coordinating optional backside.  Save this first as a png or jpg file. *make sure you save it with a new name like "backside for invitation". Then hide the layer and then you'll see all the layers for the invitation.

Where can you print double sided cards? Use Loving Life Designs Print Services email us at lovinglifedesigns@gmail.com for more information or check us out on Etsy.

If you are not planning on using the optional backside - If you plan on printing this as a 5 x 7 photo and purchasing your own envelopes. Then ignore the backside layer - you can delete it or just hide it, then begin working on your invitation.

If you have any problems email me at lovinglifedesigns at gmail dot com.


Enjoy!  *If you use it, send us a line with a picture of the final product. It would be great to see our work in use.

Creative Commons License

July 28, 2014

Reader Request
Home Sweet Home Dominican Republic Edition


A few days after I was asked to make a Texas Home Sweet Home poster, I was asked by another reader to make a Dominican Republic poster. Just like the Texas poster, I used the countries flag as a color scheme (funny how both posters used red, white and blue.) Since I couldn't be sneaky enough to find the readers home town, since they now reside in Canada, I put a red star at the Countries Capital City, Santo Domingo.

If you want your state created, email us at lovinglifedesigns at gmail.com or leave a comment. Make sure you let us know what state you would like created and your home town, the color scheme would be nice too. Please be patient it takes me a little while to get these done.


*Remember - Loving Life Designs downloads are for followers only. We ask that if you download our creations you become a follower. It only takes a second. Thanks. 

I created two files to download, a PDF and a JPG. Download both and see what works best for your printer.


Creative Commons License

July 25, 2014

Reader Request
Home Sweet Home Texas Edition


A few weeks ago I was requested, by one of Loving Life Design's readers, to design a Home Sweet Home poster in the shape of Texas. I am always happy to oblige, even though it took some time.

Because I wasn't sure what color scheme she wanted, I decided to do the Lone Star States State flag color scheme, blue, white and red. (say that three times fast!) What do you think? I think it's fun and bright. Being the sneaky person that I am, I found out she lives near the Fort Worth/ Dallas area. In the spirit of home I put a little star on the map for her. Did I get the location right?

If you want your state created, email us at lovinglifedesigns at gmail.com or leave a comment. Make sure you let us know what state you would like created and your home town, the color scheme would be nice too. Please be patient it takes me a little while to get these done. 


*Remember - Loving Life Designs downloads are for followers only. We ask that if you download our creations you become a follower. It only takes a second. Thanks.

I created two files to download. A PDF and a JPG download both and see what works best for your printer.


Creative Commons License

July 23, 2014

The New and Improved
Loving Life Designs

For the past month or so, Michelle and I have been working A LOT in order to update/relaunch Loving Life Designs. We haven't been very active on the site for over a year and we are wanting to start working again. We both thought that a redesign/relaunch of the site and brand would help our activity (at least we are hoping it helps). A fresh start is always great.

We both really enjoyed our last look and thought we hit a home run with it. It was modern and fun and eye catching. We also thought that we would like the website look. Turns out we didn't.  Because of how the site was coded we couldn't preview posts and see mistakes that would be made which meant re-writing posts and updating after they had been published. I really HATED it. I can't say the same for Michelle.

With the redesign/relaunch of the site we are going to be offering some new services. We'll still offer our free designs and printables, but we'll also be opening two new shops.  A premium design and print shop. More information to follow on those two new services. We'll keep you updated.


Lets take a tour of the new look!

First thing we did was make it a traditional blog again.


Old Look


New Look


Like I said before we felt we hit a home run with our last relaunch so most of the elements and colors will remain the same. We did redesign the header.


The sidebar is a little different too. We made a new profile image, added slide show feeds to our Instagram pages,  created links to our design pages, and created some social media icons for our new twitter, instagram and pinterest pages.


What do you think?  It's always really scary to do a redesign. We think it's clean, modern and easy to navigate. We hope everyone likes it. Hopefully this new look will bring new life to our designs and light a fire under our rear ends.

Thanks for reading. Enjoy.


Creative Commons License

April 18, 2014

Free Font Friday - {Janda Elegant Handwriting}

Today the font I am sharing with you is the font I used in the When the Son Arose... Easter poster from Monday.

The font is Janda Elegant Handwriting by Kimberly Geswein of Kimberly Geswein Fonts.


If you like this font take a look at her website. She has a ton of fonts all of them are just as pretty as this one.

Janda Elegant Handwriting font is free for personal use but Kimberly asks that you donate $5 for commercial use. You can download it from DaFont or from Fontspace.

Creative Commons License